For starters, I would have done the pockets differently. While I did like the design, the problem was they either stuck too well in some cases making it difficult to stuff and remove the inserts or not well enough so that they needed to be re-glued. What I would have done differently was to use something along the line of a sticker on the inside of the pocket to make it more like a pouch or try a more radical solution like sewing the pocket together instead. Unfortunately I was to the point where the invites were almost finished and was able to get around this problem with a butter knife to loosen the pocket or a glue stick to re-secure the pocket.
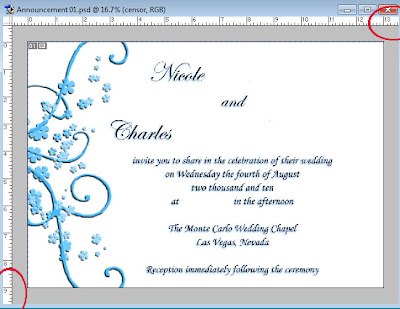
The printer was a whole other issue. When I initially started the images in Photoshop they were all sized normally as I wanted them. Eventually my fiancee and I figured out that if you scale the image up in Photoshop and then shrunk it down when you sent it off to print that it enables the anti-aliasing feature to make the image crisper. Slowing down the print speed also helps to give the printer more time to fully ink the project properly.
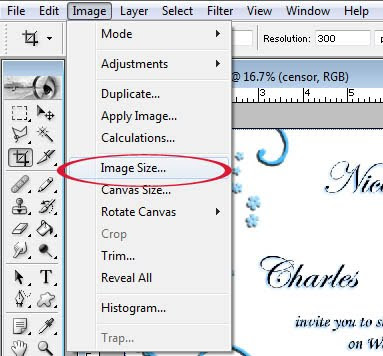
First scale up the image by going Image -> Image Size
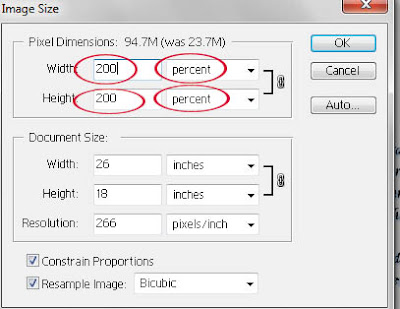
Next, scale up the image by selecting percent and input either 200 or 400 for both the height and width.
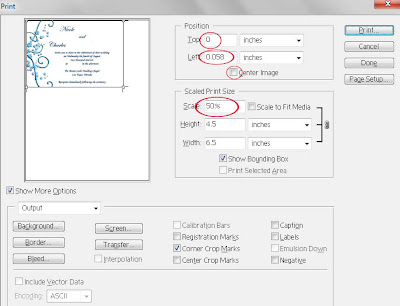
When you're all finished with designing the invites hit Ctrl+P to pop up the print screen. Position the image where you want to get multiple items on a the page. Next, the most important part, scale down the print size in this window so you can have the anti-aliasing take effect. Use 50% downscale for a 200% larger image size (see last step), 25% for 400% etc.
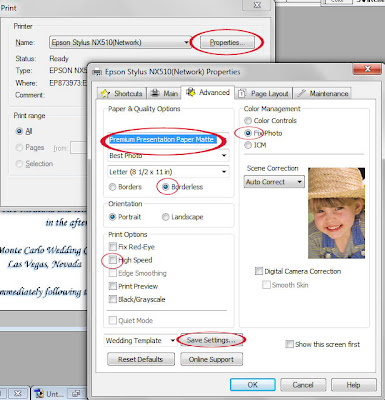
Lastly, print the suckers. Make sure to select the right paper type, have it enabled for photo printing and don't print in high speed for best results. Save this template if you need to print multiple files at this quality to save yourself the headache of remembering to do all this every time. Do not scale the media here, it will just cut off everything that didn't make it on the page and scale down everything that did leaving you with half (or less) of your project. Make sure you have patience, extra ink cartridges and lots of alcohol while printing.
The software portion of printing was the tricky part, but sizing the paper was also difficult. In the end I decided to cut the paper to the width I needed and not worry about the bottom because I would just be cutting it off later anyways. The pocket fold closers had to be dealt with a bit differently since my tray width wouldn't go that small, so I just printed on the smallest width I could and cut off the excess
The embossing was a bit tricky as well, but I only embossed the announcement and pocketfold closers. At first I tried using an embossing marker so I could trace over the image and sprinkle on the embossing powder. This took much longer to to than anticipated and it also marked anything blue instead of being "invisible" or "watermarking" the paper. Instead the solution I came up with was to yank them out of the printer as soon as they were done printing and sprinkle on the powder while the ink was still a little wet. This process had mixed results but was far easier than tracing the large graphic. Sure it didn't stick so well (if at all) to the black ink, but it clung to the blue ink rather well if I didn't wait to put on the powder and gave the added oomph that I was looking for.
Gluing was nothing special. I just used a standard glue stick and put the pieces of brown card stock together (sizes mentioned in previous post) with the pieces I just printed off and viola!
Belly bands were the easiest part of this entire project, finding the ribbon again in case I needed more than what I originally calculated was a pain in the ass. Luckily I didn't need any extra ribbon, but bought some that looked similar just in case.
Just measure around a folded invite

cut


fold the ribbon

and then using the same invite and some wax paper, secure the ribbon and closer together with some hot glue leaving some slack to slip the ribbon on and off the invite. The wax paper is there so you don't get hot glue all over your nice invites and can still use the one you used to measure everything out.
With everything made all that was left to do was stuff the pockets with all the inserts, slide on the belly band and make sure I've got the right envelope before I stuck it in the envelope and sealed it for good.


So with all the hard parts done, I took all of the finished invites (I was still missing addresses on a few) down to the post office, weighed one and got enough 61 cent stamps for all. Once all the stamps were on I loaded them up into the drop box and said good bye to months worth of planning, experimenting and hard work.
