I came across this project while perusing though other pages and really liked the idea of having the envelopes lined. While I really wanted to have an engagement picture of us as the liner I figured that most people will tear the top portion open with a letter opener and destroy the nice picture. Keeping that in mind I was on the hunt for some scrapbooking or wrapping paper that would work with my pocketfolds instead of being a distraction.
Searching through endless amounts of X-mas, birthday and other holiday prints I finally decided on using just plain 'ole silver to line the envelopes for the majority of them. For a select few for our parents, siblings and grandparents I'll be using a pearl colored thick vellum paper that I was able to get 5/$1 at Michaels in the scrapbooking section.
The next part is fairly straight forward but if you want to skip all this nonsense the measurements for the square template for the inserts are 7-1/16" by 6-5/8". This only works if your envelopes are 7-1/4" by 8-3/4" unfolded with about a 5/8" glue strip which is technically an A7 with a straight across flap that I got online from envelope mall. If you don't have that type of envelope the next few paragraphs and pictures are how I got to the template, otherwise skip ahead to the **.
The instructions are really simple and begin with making a tracing template. Start by getting an envelope you don't mind destroying with pencil lead or from cramming the template inside to see if it fits. Open the flap and put the envelope address side up on a piece of cardstock, cardboard from a cereal box or even some thick paper from something like the phone book cover; just don't use corrugated cardboard. Pushing down on the envelope to smoosh it as flat as you can get the sucker, trace to get an outline.
Since this is a template, cut out what you have so far and trim where necessary so you can fit it in there. It doesn't matter at this point if the left and right sides are completely straight but make sure the top of the template isn't too tall.
Next, measure the thickness of the glue strip so you can exclude it from your liner; it's alright if you over compensate for this a little. While I have a flat flap instead of a Euro flap it will be easy for me to just measure a straight line for the glue strip. Those that have a Euro flap might want to make a few marks for where the glue would sit and use the envelope again to trace at those markings.
Insert the template inside the envelope again to make sure the template doesn't cover up the glue strip, trimming where needed.
Lastly, I was unsure about the white space around the liner so I looked up some pictures as well as some of the samples acquired through friends' wedding invitations to find that the insert is just one big square at least for the straight across flap. This was why I wasn't too concerned about the left and right sides were perfectly straight because you'll be cutting them away (same with the Euro flap style) to allow for a border.
So with that, I traced some of the inside of the pocket for a re-inserting reference, eyeballed where I wanted the white space to be and cut the template into a square instead of the outline that it was. Re-insert the template and cut small amounts away until you're satisfied with how the template looks inside the envelope.
*****************************************************************
So with the easiest part done, use your brand new template on your paper and trace out as many as you can get (or need) and cut them out using whatever method you're comfortable with. Make sure to erase the lines after cutting out the inserts if you are using vellum paper or it will show through; you won't have this problem if you're using regular paper.
Trace
Cut
Stack of them
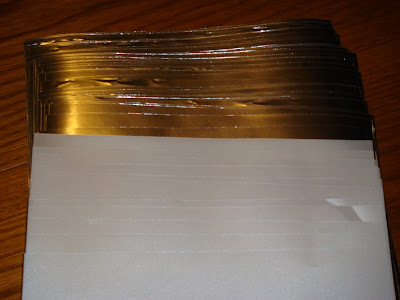
Now for the glue.
Before I decided to slather on a bunch of glue on to my printed envelopes when I didn't have enough to replace them all, I tested the glue. What I was afraid of was having the tacky glue wrinkle or somehow negatively effect the liner or the envelope paper. I was very glad I did because this is what I got:
Gross right?
So I looked around the apartment and my desk at work to find a glue stick. I read a while ago on a help thread that a glue stick would be the best and cheapest way to go if you were worried about wrinkling your paper. You can use double sided tape or glue dots but you can see where the both of those are with thinner paper, plus I can't stand using either of them. This is what I got from the glue stick:
Once I decided on the type of adhesive to use, it was time for the tricky part. Since I didn't have the envelopes from before they were assembled in their current form, I would need to find a way to get the liner into the envelope without destroying the envelope or the liner. This proved to be somewhat difficult, but found that using wax paper made everything easier.
First I put a small strip of glue from the glue stick on the top edge of the liner and aligned it to the glue strip on the envelope:
Next I flipped over the liner and put another line of glue on the bottom edge and then took some wax paper folded it in half and put it over the glue making sure I had enough wax paper that I could fold over to the other side.
With the liner still folded back I put a last strip of glue on the fold of the envelope. This was to prevent the liner from rolling away from the envelope when opening at the flap or from detaching if a letter opener was used to open the envelope.
The next two steps were a little tricky and require patience but you take the liner, roll it up and away from that glue strip you created in the last step and insert it into the envelope. Gently scoot the liner in there and detach it from the glue strip when it gets caught rather than pushing down on that big "bubble" you created.
Smooth the liner down at the glue strip and reach in to grab the wax paper that's attached to the bottom part of the liner. This should roll the liner up to you with the glue side up but be gentle and pull at the wax paper evenly along the width.
Remove the wax paper from the glue and push it back into the envelope, lifting the envelope to make it easier to reinsert and keep the glue from sticking. If you're using thinner paper be nice and coddle it to avoid poking through the paper and don't worry about wrinkling the it a bit because no one will really be seeing this part.
Wipe away any excess glue you see and weigh down the envelopes when you're finished.
After giving the glue enough time to dry go through them and see if any need to be separated or if the pockets accidentally got stuck closed.
That's it! Envelope liners = CHECK!!
Wednesday, January 20, 2010
Monday, January 18, 2010
Envelope Printing
I had decided long ago that I wanted to print the addresses directly on the envelopes for my guests rather than hand write the labels. This was because my handwriting isn't as great as I would like it to be even though it is legible enough for the postal person to decypher. I searched around on the web for a bit and printed off a few test pages but here's what I came up with. Just a note that this might not help everyone because of software and printer differences but I'm using Microsoft Word 2007 and an Epson Stylus NX515 inkjet printer, so here we go.
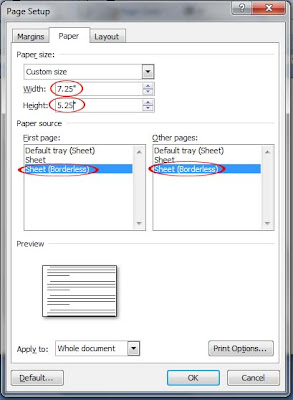
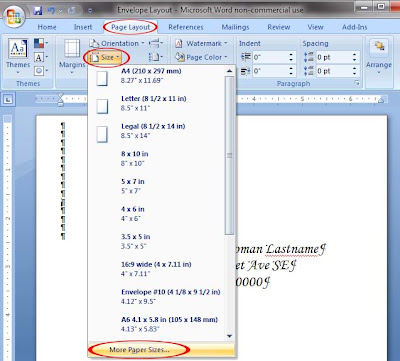
Open a new document, go to the "Page Layout" tab click on "Size" and select "More Paper Sizes" if you don't already see your envelope size there.
This should bring up a menu that has you in the "Paper" tab. In that tab put in your envelope width and height and select "Sheet (Borderless)" for both first and other pages.
Next click on the "Margins" tab and set the top, bottom and right margins as far as they can go at .12" with the left margin at .5" and click ok. I had the margins this way so that the left side would be slightly indented as you can see on most printed envelopes.
Using Arial 11pt font with single line spacing go about 14 lines down before starting your text. I know there's a better way to do this by using the "Mailings" tab and selecting "Envelopes", but you don't get to see how the layout looks before you print. So back on track, 14 lines down I centered the text and used Monotype Corsiva 22pt font for the names & addresses. This is the font I used inside on the invites so that it all ties in with everything else.
Next, we test print to check the positioning and text size on a regular piece of paper. Fold the paper to the size of the envelope after it has been printed to get an idea how this all will work so you don't waste too many envelopes in just testing. Adjust the address so that the name line is around the center vertically (if you chose a different font) and play with the size until you're satisfied that the font isn't too large or small to you.
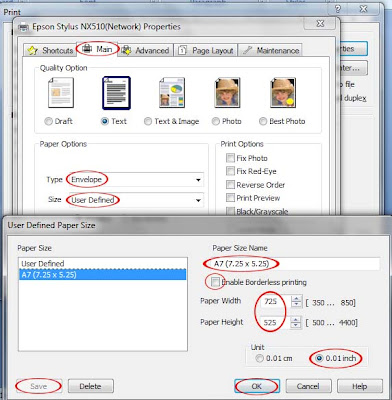
Once you've got all that figured out you're ready to print on the envelopes. Go to the printer properties and from here everything might differ based on your printer but it might give you an idea of what you'll need to do. In the main tab under paper options set the type to "Envelope" and size to "User Defined" if your envelope size doesn't show up in the drop-down menu which will open up a window. In this window set the paper width & height making sure the units are in inches, not centimeters, saving and naming the settings if you wish and then clicking ok to close the window. Click ok on the properties window and ok to print and that's it for the software.
As for your printer, make sure you adjust your paper width on the loading tray so that there is no extra room for the envelope to "wiggle" around and miss-align all that hard work and load the tray one envelope at a time to prevent the printer from grabbing multiple envelopes and jamming. Then that's it. TA DA!
You don't necessarily need to do this the same way I did, but it's just the way my brain works and how I got this to do what I wanted it to. As a side note, I created and printed the envelopes one at a time and saved one random page as a template to come back to later and run off a few more as I finalized addresses and correct spellings of names. I also plan on lining the envelopes but held off on doing so until after I printed on them because I was worried that the extra paperweight would tick-off the printer and cause it to malfunction somehow. Hope this helps anyone out there.
Saturday, January 16, 2010
Timeline Rant
So this is the first all-out rant that I've posted. After getting a bit of guff from the online crowd about my invitation and RSVP dates, I feel the need to blow off a little steam. While my fiancee, my family and my fiancee's family don't seem to have a problem with how early I've put everything, everyone else is quick to jump on the impulsive planning side of the bandwagon.
To start off, I'm a planner. I like to know way in advance of anything that I'll need to travel to that takes more than a few hours to drive to and don't really like to put the rest of my life in the back seat when some event pops up with only a few weeks notice beforehand. This makes it easier for me to ask for time off from my boss without having to fight anyone for time off, save up for the costs of traveling, and plan on what I'll need for the time on the road. I don't make much so the saving up portion is crucial to me.
With that being said, I'm trying to send the invitations out for our August wedding before the end of February. My reasoning is that because I won't be sending out save the dates (which are a new trend) and because the mail can take up to a week to go from west to east coast that this would be beneficial to anyone who knows that they're already going. I've also been getting people practically chomping at the bit for this information and don't want to spend the extra money on save the dates when so many people before this fad have made due without.
So the criticisms with that are that people might lose them, that this is too much of an advance notice for most people, and I'll get endless calls from those who loose them about RSVPing and asking for information that was included in the invite. I say balderdash to all of that and they're adults, not children. If this is important to them then they won't lose the invitation and will be responsible adults about the whole situation. Those that lost the invitation probably were not going to attend anyways.
Now here's the kicker and where most of the heat comes from: the RSVPs. I've been debating a little with myself about how early is too early for people to know that they're going to be traveling cross-country for a formal event. Estimating that people could be throwing the RSVPs in the mail up to two weeks late, the mail itself can take up to a week to get to me, favors and other online ordered things take about a month to order and get to me, and that we're driving 19+hrs down to the venue with all the favors, doo-dads and what-nots for the wedding I figure asking for an RSVP somewhere in April is fair especially when we're videostreaming the ceremony for those that can't come.
So let's take the criticisms one at a time.
1) No one will know that far in advance what they'll be doing, if they'll have a job or the money to do this.
Uh, yes they will. This is in the summer when most people take time off for vacationing and I haven't known any adult that hasn't asked for vacation time under 4 months away with this much of an advanced notice. True they could lose their job, have someone get seriously ill, break a leg or something of that nature but a giant asteroid could also collide with the earth or terrorists could nuke the entire eastern seaboard too. What I'm saying is any adult who has sat down to see if this is possible should know by then. If it turns out they RSVPed with a yes and suddenly had something happen to them that makes them unable to attend, then they'll call to cancel and watch the stream; no harm, no foul. If they said no and can now attend, they'll most likely just watch the stream because it's rude to unexpectedly show up to a formal event when you said you weren't going to be there.
2) Airline prices that far out are more expensive than 2 weeks away from the date.
This is a little bit true, but this also comes from people who have just read the articles out there about when to book your flights instead of watching them yourself. I do and have watched the airline ticket prices and there is a bit of a lull somewhere around the 4-5 month period (which is a little bit more expensive than 8-months before the flight) before they spike up once again. True, you could try your luck at getting a flight 2 weeks beforehand, but that's on a space available basis only and you could be s.o.l. for a flight with so many others trying to do the same during a peak time of the year. As a side note, when trying this experiment don't forget to delete the tracking cookies in your web browser that the travel sites and airline pages leave there or else the prices will rise anyways.
3) People will lose the invitation and RSVP.
Like I said before, balderdash; they're adults, not children. If this is important to them then they won't lose the invitation and will be responsible adults about the whole situation. Those that lost the invitation probably weren't going to attend anyways. Anyone who can't find their RSVP can always call. If they need another copy of the inserts it's easy enough for me to just print them off again and mail it it to them but without much of the fun stuff that was in the original invitation that they so kindly lost.
I think the main problem is that most people are assuming that adults nowadays need to be walked through everything and treated like forgetful little children. Sure it might be a lot to ask that people be the responsible adults that I know they're capable of being, but when have we gotten into this phase where we talk and treat everyone like children because we don't trust them to be adults? Furthermore, with an invite list of 126 people (with guests) as long as our parents, siblings, and grandparents make it there we'll be fine; everyone else is just a bonus.
Friday, January 15, 2010
Centerpieces - Purchasing
I'm still trying to pull my ideas together but so far I've purchased and received vases & mirrors for about 24 sets of centerpieces via the Trash to Treasure board on the knot. Some of them were broken because UPS is not gentile with packages no matter how well they are packed or if they say fragile or glass on the box, but for the most part I think I got them for quite a deal.
This is what the vases look like and what the original seller did with them:
What I plan to do is have the same basic setup, but with "floating" candles in all three. After that I'm still debating on what to have under the candle. One idea is to have fake orchids and water floating in the tallest vase (still figuring out how this will work) with the water possibly dyed blue, rice in the medium vase and coffee beans in the smallest vase. I love the floating flowers look but I'm not sure if the other two vase ideas makes the centerpiece look thrown together instead of thought out.
I'm still working on mock-ups at this time and nothing has been finalized as of yet. So far I'm not sure if I'll hang on to the table number idea since the thought of having a seating chart makes me feel like I'm forcing people to sit where I want them to be instead of just letting things happen. Other things to come in due time but for now I'm concentrating on getting those damn invites done.
Tuesday, January 12, 2010
Teasing Myself
Along time ago (March) I bought my wedding dress with my Maid of Honor, Chey, who came along with me for the ride. I had scoured the internet and came across the David's Bridal website, perused their catalog, and went there prepared to try on a whole categorized list of dresses that had piqued my interest. Hours later we walked out with a dress. While I was mostly satisfied with my selection because I got it on super deep discount since they discontinued the pattern, I felt like it was a little lacking looking more like a high school prom dress and less like something that would make me look more mature, elegant, and worried that it made me look more like a child.
While I hope that this can be fixed by a few alterations, I also went roaming around on the internet and found the Casablanca line rather appealing, particularly their 1945 dress. I looked up the local stores that carried this style and held off rushing to find and try on this dress. Last weekend I was able to go to a store that had this dress and decided to tease myself by trying it on and sneaking a peak at the sales tag.
Honestly, I really, really like this dress and all the little embellishments but can't justify purchasing it for $830 since I already have a dress. It's not like I don't think it's a good price, I just can't afford to make such a purchase on my income. So, after much arguing with myself I decided it would be best if I promptly left before I bought it on impulse.
When I got back home I showed my fiancee the pictures I took and what my dilemma was. He said that if it makes me happy then I should purchase it; damn I love this man. After talking it over with him I finally decided and explained to him that IF I get the job that I applied for that significantly increases my income, then I'll think more seriously about going and trying it on again to purchase and I'd need him to be there with me for critiquing. For now, I can dream.
Pocketfolds, Securing the Pocket
Once you're done with scoring, folding and cutting your pocketfolds it's time for the messy part: Securing the Pocket. There were many ways to do this from just plain 'ole tacky glue to fancy-schmancy glue dottie thingamajiggers that turn out to be expensive if you have a lot of pocketfolds to make. I just stuck (haha!) with the tacky glue because I wasn't sure how well the tape or glue dots would work, I didn't have to worry about a certain width being in stock, and was a bit worried that the glue dots would create an odd texture and undesirable increase in thickness. before going ahead with putting the glue on the pocketfolds, I did test it out on some scrap paper to make sure the glue would hold and not unstick at a later time.
With the testing done I picked up some regular tacky glue and some cheap foam paint brushes so I could get a thin layer on the paper. I also used some scrap cardboard I had lying around as a "paint" tray and so I could get the glue all the way to the edge without smearing it all over the dining room table and "painted" a thin layer of glue onto the pocket just like this:
After that, I closed the pocketfolds, smoothed them down by pushing outward so any excess glue seeped out rather than in, removed the excess glue that seeped out (if any) and then stacked them underneath some heavy boxes (or you can use books) to dry.
Ta da
A day of drying and forgetting about them later, I took them out from underneath the heavy boxes and made sure none of them stuck together. This is one of the downsides to working with glue but fortunately for me, I used just enough glue for the pocket to stick but not enough for them to stick together so much that they disfigured themselves when I took them apart. There were a few that were slightly stuck, but it was nothing to get my panties in a bunch about.
Other than that Pocketfolds = done, still working on everything that goes inside.
Sunday, January 10, 2010
Pocketfolds, Cutting the Suckers
To start this whole she-bang I did countless cutting trials to get this right so that I don't cut too much out or cut something wrong. I found out that the top flap was going to be easy, but the bottom part of the "V" in the pocket flap was going to be trying my patience and need to strive for perfection. My fiancee was great at helping me decide if I was being too harsh on myself or not and in the end I found a rather peculiar work-around.
To start off, just like most people, I made a template out of some thick cardboard I had lying around from boxes and packaging. The top and bottom have a 1" space before the "V" begins and I centered the point of the "V" at 3.5".
The next part I did in batches and did the easier top flap first by tracing
then taking my rotary cutter and cutting the suckers.
With the first and easiest part done I waited a little bit to figure out how to get the bottom point cut crisp and cleanly. I first tried to use the rotary cutter but found that I had one helluva time figuring out where the stopping point was. I then tried the X-acto knife but found that I couldn't get the cut straight, that I was over-cutting, or I couldn't seem to get the last little bit of paper to come off. After some hunting around I had an epiphany to use a punch to get the job done. The next challenge was to find a punch that could do the job. Unfortunately there are no punches that had the exact angle I wanted, but I even found it difficult to find a punch if I settled for one with a right angle that would punch a ^ instead of v. The difference was how I would insert the paper to get my desired edge; the v shape is more for corners, I was looking for an inner corner shaper if that makes any sense. So with some creativity and a certain method in my head I set out to our tiny Michaels store and found the only thing that would come close to what I wanted was a square punch. Sure, I had to creatively maneuver the paper to get the punch to get the desired pattern, but the end result yielded the crisp, clean look I was going for. Once I got what I wanted, I put the game plan into play.
First, trace
Then cut, but leave a little bit extra on the bottom of the "V" connected
just like this:
Then comes the "scary" part. Just yoink off the excess so you have an ugly looking corner. Don't worry about this because you'll be able to fix it later.
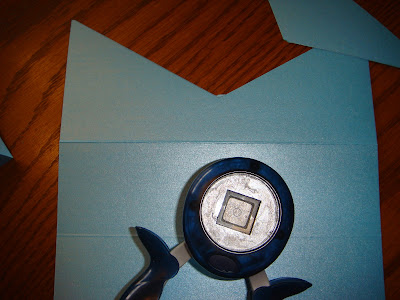
Then, with the handy-dandy square punch, or with whatever you found would work for you, trim the corner so it has the desired clean and crispness that would have been achieved if you had a big industrial cutter.
Lastly, after all is said and done look over your pocketfolds. If you're a stickler about the details you'll notice that after you cut this paper that the bottom side of the cut has some sort of a "lip" while the top side looks clean, like this:
I'm not sure if it's just with the Astrobright Glisten paper I'm using or if all papers do this but don't worry, it can be fixed simply by smoothing over the edge with your butter knife/boning folder. Then once you're done it's off to the next step: Securing the Pocket.
Monday, January 4, 2010
Actually Dying the Slip
I know I'm about a month late from posting this from the time I actually completed this process, but whatever it's up here now.
To start with, I used three packs of Dylon Bahama Blue dye but then thought that since I bought four packs that I might as well use all four. I used a big black tub for dying, since I didn't want to stain my tub, added the hottest water that would come out of the faucet, 1c of salt per packet, and poured in the packets one by one that I mixed with boiling water in a bowl before combining it with the big tub of water to make sure it was dissolved.
The next step was to wet down the crinny with warm water and to add it to the mixture. This was the toughest part for me because there was no going back once I put it in the dye and if I didn't like the outcome then I'd have to spend another $50 to get another slip, so yeah I was a little worried.
I used long BBQ tongs to stir the slip/dye mixture after my last experience and unwillingness to dye/scald my hands blue and just kept mixing until I wanted to stop. I think I stirred for at least half an hour and walked away for a minute or two somewhere in there just to stretch.
So after some time I decided that the slip wasn't going to dye anymore and I was content with the color I achieved and dumped the dye down the drain and proceeded to rinse the crinny when the water had cleared. This took a while as well because I thoroughly rinsed all layers because for some strange reason there were little dots of dye either from leftover dye that hadn't dissolved or from some fabric that somehow fell off and clumped on the tulle. No big problem though, all looked fine from what I could tell.
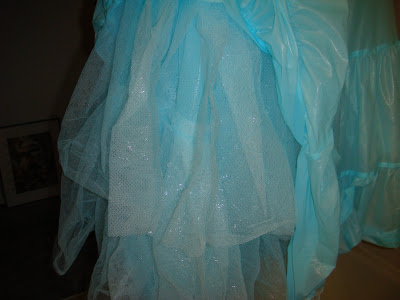
With all that said and done I hung it up to dry and used clips that are normally used to close chip bags as clothespins. I did notice that the tulle was really light, but when it's layered together with a lot of the tulle it looks just fine. I think this could be because the thread count (or whatever it is for tulle) is very low compared to normal fabric
The last problem is that some of my tub was tinted blue, but I could easily scrub that out with a pumice stone. Oh, and I took off my rings before messing with any of this since I didn't want them coming anywhere near this mess.
Other than that, slip = done.
Subscribe to:
Posts (Atom)