Showing posts with label DIY. Show all posts

Thursday, July 15, 2010

Corset Ribbon

I forgot to take pictures throughout the process so my doodling will need to suffice.

Step one: find your ribbon
I chose a light blue sheer ribbon and a white satin ribbon so that I could see the light blue ribbon. My dress also has a sheer organza overlay and has around the same color of blue already in the dress so this works well. I believe I chose a 1-1/2" wide ribbon for both and bought at least a 4 yard spool.


Step two: sewing together
This is where the doodles come in because I just went for it, sewed it all up and then realized I should have taken photos. Line up the sheer ribbon on top of the white satin ribbon and sew straight across the ends to have them together. Make sure that they're aligned because this is a guide for sewing the rest together.


Step three: the pull
I call it the pull because later, after all the sewing is finished, you will be pulling this to turn the ribbon right side out. Pretty straight forward, find something long, durable and thin like twine or thick string and also sew straight across this to the ends that you just sewed together. Make sure the pull is secure so you don't loose it while turning the ribbon right side out, this may require you to do a few passes over it with the sewing machine.


Step three: fold
Fold the ribbon over the twine hot dog style so that the twine is on the inside with the ribbon you eventually want to be on the outside. If you want to, take the iron to the fold so you get a crease and make it easier on yourself in the next step. I didn't do this and I wished later that I had individually ironed a crease into the layers because it probably would have made things easier. Oh well, live and learn.
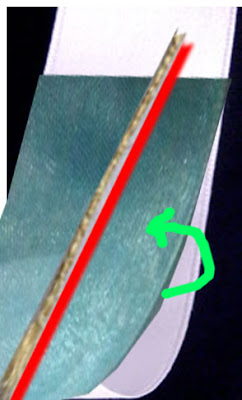


Step four: lots of sewing
This requires lots of patience because you need to make sure you are sewing both sides of the ribbon sandwiched inside and ribbon currently outside without running over your pull all while trying to get the stitch as straight as possible. Don't worry if you don't get everything completely straight because no one will really notice unless they look over the entire length and are looking for imperfections.


Step five: pull the pull
VERY CAREFULLY pull on the other end of the pull that is not sewn down so that the ribbon on the sewn end starts to roll inside to turn the ribbon right side out. This also requires lots of patience but doesn't take nearly as long to do as the sewing.


Step five: spot check
Most likely there will be one or two places that the organza ribbon did not get sewn into the satin ribbon. Calmly and patiently turn the ribbons inside out until you get to the trouble spot, pop some of the seam until you can correct the positioning of the ribbon and run it over with the sewing machine again. Turn it right side out and double check the correction.

Step six: iron
What I did to help was grab a long metal rod, feed it all the way through and used it to make sure everything inside was laying flat and not bunched up. I ironed on a medium heat to crease everything and made sure my seam remained on the same side and didn't twist around as I removed the rod and then went over it a second time to be sure. It does have some areas that are a bit chunkier than others but you can't really tell in this photo and I don't think anyone will be able to tell when it's strung in the corset backing either.


Step seven: lace and sew up
This is simple; lace up your dress, make sure the length is correct, snip off the excess and then you can just turn the ends inward and either hand stitch or run them over with the sewing machine to close the ends.

Ta Da!

=check!

Monday, June 21, 2010

Bubbles and Fans

Now that my summer class has finally ended, I have been able to get back to the wedding planning process. There's already a more complicated project going on right now, but I figured that I would knock off one of the easier projects. This time it was the bubbles and fans.

Items:
- Assortment of fans purchased through The Knot
- Bubbles purchased through The Knot
- Ribbons purchased on sale at Michaels
- Flower boxes purchased at Ikea

I started this off by unloading all three 48-count boxes into one of the flower boxes. My fiancee though this looked fine, but I wanted it to look more organized and stay organized when people take out the bubbles. So I took the cardboard spacers that came with the bubbles and used that to keep the bubbles all in place.


Here's a photo of the bubbles in the boxes with the cardboard spacers in place. I wanted to see what this would look like with the fans so I took them out of the boxes and placed them into the other flower boxes I had. My fiancee kept on laughing at me because I would have to put all of the fans back into the boxes afterwords. He just thought it was funny how obsessed I was with seeing everything all together.


This was not the final result, just how everything would looked all spaced out. To spice things up a bit, I purchased some ribbon during an easter clearance sale and used it to decorate the bubbles. Due to poor planning, I only grabbed one roll of brown ribbon and should have probably grabbed two.

The ribbon was cut into 6" lengths and then I tied two pieces around the heart base of the bubbles. Half of the bubbles had one brown and one white ribbon while the other half had two white ribbons.


All together:


But the fun doesn't stop there! Because I had so much ribbon left over I decided that there needed to be more to these boxes. With that, I took a hand punch to the sides and spent time looping the ribbon through the holes to make the sides look fuller.


There were a couple of snaffoos with punching the holes too close together or being a little too rough with cinching down the ribbon which resulted in tearing which resulted in tearing the cardboard. I fixed this situation by using judgment to cover up the tears and came up with a fuller looking result:


This may or may not be the finished project because the boxes don't have a polyurethane coating on them to be water resistant. We may end up staining the wood as well, but we're still pondering if we want to do that. For now, the boxes are (mostly) assembled!

Saturday, March 27, 2010

Invites Away!

After much work and shouting at the printer I was finally able to assemble and send out our invitations. There are still a few people I'm waiting due to address changes but for the most part I sent the bulk of them out about a week and a half ago. While this was a learning experience, there were a few things that I would have done differently if I knew then what I know now.

For starters, I would have done the pockets differently. While I did like the design, the problem was they either stuck too well in some cases making it difficult to stuff and remove the inserts or not well enough so that they needed to be re-glued. What I would have done differently was to use something along the line of a sticker on the inside of the pocket to make it more like a pouch or try a more radical solution like sewing the pocket together instead. Unfortunately I was to the point where the invites were almost finished and was able to get around this problem with a butter knife to loosen the pocket or a glue stick to re-secure the pocket.

The printer was a whole other issue. When I initially started the images in Photoshop they were all sized normally as I wanted them. Eventually my fiancee and I figured out that if you scale the image up in Photoshop and then shrunk it down when you sent it off to print that it enables the anti-aliasing feature to make the image crisper. Slowing down the print speed also helps to give the printer more time to fully ink the project properly.


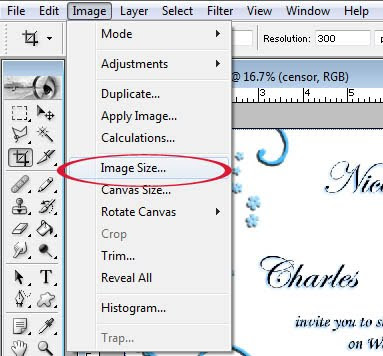
First scale up the image by going Image -> Image Size


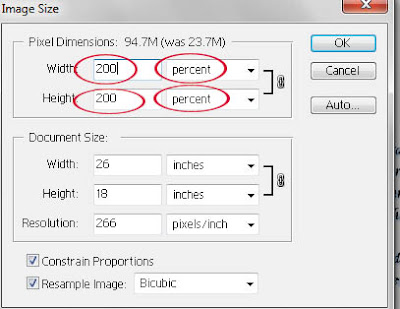
Next, scale up the image by selecting percent and input either 200 or 400 for both the height and width.


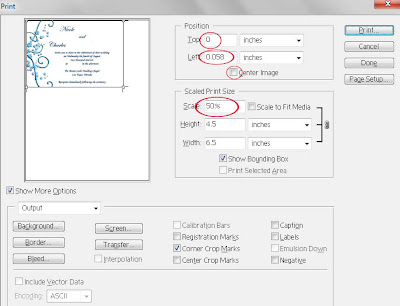
When you're all finished with designing the invites hit Ctrl+P to pop up the print screen. Position the image where you want to get multiple items on a the page. Next, the most important part, scale down the print size in this window so you can have the anti-aliasing take effect. Use 50% downscale for a 200% larger image size (see last step), 25% for 400% etc.


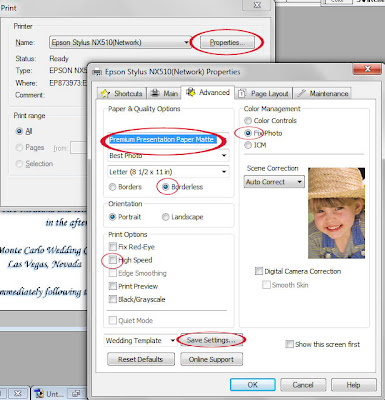
Lastly, print the suckers. Make sure to select the right paper type, have it enabled for photo printing and don't print in high speed for best results. Save this template if you need to print multiple files at this quality to save yourself the headache of remembering to do all this every time. Do not scale the media here, it will just cut off everything that didn't make it on the page and scale down everything that did leaving you with half (or less) of your project. Make sure you have patience, extra ink cartridges and lots of alcohol while printing.


The software portion of printing was the tricky part, but sizing the paper was also difficult. In the end I decided to cut the paper to the width I needed and not worry about the bottom because I would just be cutting it off later anyways. The pocket fold closers had to be dealt with a bit differently since my tray width wouldn't go that small, so I just printed on the smallest width I could and cut off the excess

The embossing was a bit tricky as well, but I only embossed the announcement and pocketfold closers. At first I tried using an embossing marker so I could trace over the image and sprinkle on the embossing powder. This took much longer to to than anticipated and it also marked anything blue instead of being "invisible" or "watermarking" the paper. Instead the solution I came up with was to yank them out of the printer as soon as they were done printing and sprinkle on the powder while the ink was still a little wet. This process had mixed results but was far easier than tracing the large graphic. Sure it didn't stick so well (if at all) to the black ink, but it clung to the blue ink rather well if I didn't wait to put on the powder and gave the added oomph that I was looking for.

Gluing was nothing special. I just used a standard glue stick and put the pieces of brown card stock together (sizes mentioned in previous post) with the pieces I just printed off and viola!

Belly bands were the easiest part of this entire project, finding the ribbon again in case I needed more than what I originally calculated was a pain in the ass. Luckily I didn't need any extra ribbon, but bought some that looked similar just in case.
Just measure around a folded invite


cut


fold the ribbon


and then using the same invite and some wax paper, secure the ribbon and closer together with some hot glue leaving some slack to slip the ribbon on and off the invite. The wax paper is there so you don't get hot glue all over your nice invites and can still use the one you used to measure everything out.

With everything made all that was left to do was stuff the pockets with all the inserts, slide on the belly band and make sure I've got the right envelope before I stuck it in the envelope and sealed it for good.


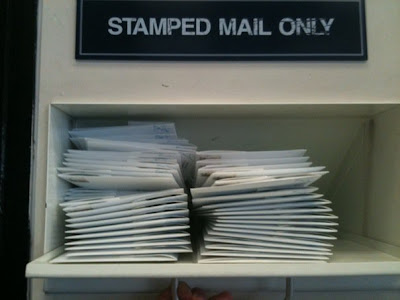
So with all the hard parts done, I took all of the finished invites (I was still missing addresses on a few) down to the post office, weighed one and got enough 61 cent stamps for all. Once all the stamps were on I loaded them up into the drop box and said good bye to months worth of planning, experimenting and hard work.

Tuesday, February 16, 2010

Invites - With a Mockup

After playing around with a lot of paper, ink, embossing powder and doing a whole lot of printing I finally came up with this mockup:


The fiancee and I are very happy with the results and I can't wait to get everything together and send them on their merry way. For now, this is the finished look (ignore the chopped-off tops of the inserts) but I might be adding some embossing to the backs of the inserts, to the inside of the pocket or to some of the empty blue spaces you see in the above picture. That's all to be determined though and all depends on how fed up with the project I am when I reach the end. In the picture above I did emboss all the inserts as they came out of the printer, but I determined that this takes up too much time and has very little payoff.

For the Pocketfold:

Dimensions: 13-1/8 x 7 right now
16-1/8 x 7 when it's all unfolded

creases at: 3" from top
3" from bottom
8" from bottom


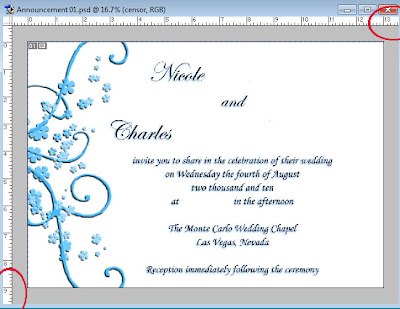
The Announcement:


Font: Exmouth size 36pt for names, 28pt for the "and"
Monotype Corsiva 14pt for the rest of the text

Dimensions: 4.5 x 6.5

Brown background: 4.75 x 6.75

image on left is a brush style from: http://www.brusheezy.com/
the Swirls and Flourishes set by Obsidian Dawn

I will be embossing the blue image on the left by throwing embossing powder on it as soon as the printer has finished printing it out. I found that doing it this way gives me just enough ink for the powder to cling to so that I don't need to use the embossing pen. The only problem is that I'll need to print out the invites one at a time and sit next to the printer with all my embossing supplies in tow. Hopefully I don't spill the container of embossing powder all over everything.


Las Vegas Map


Googled "Las Vegas Maps" and got something like this in red. After many hours I changed everything to blue. I also decided after going to Vegas that many of the places that I originally put on the map are unnecessary and they can all just pick up an actual map with all the little items on it when they check in.

Font: MS Serif size 9pt for the labels, all in caps
Edwardian Script ITC size 30pt for "Las Vegas Map"

Dimensions: 4.5 x 6.25

Brown background: 4.75 x 6.5

the image on the top is also a brush style from http://www.brusheezy.com/
from the same set


Accommodations


Font: Edwardian Script ITC size 30pt for "Accommodations"
Monotype Corsiva 14pt for the rest of the text

Dimensions: 4 x 6.25

Brown border: 4.25 x 6.5


RSVP


Font: Edwardian Script ITC size 30pt for "RSVP"
Monotype Corsiva 14pt for the rest of the text.

Dimensions: 3.375 x 4.875

Brown border: 3.5 x 5

I made them this size so they fit in the A-1/4 Bar size envelopes.
I'll also be individualizing the RSVPs to try and avoid write-ins.


Pocketfold Closer


Letter: Edwardian Script ITC size 440pt with a drop shadow, contour, bevel and emboss
Goudy Old Style, Italic, size 78.12pt for the rest of the text with a white stroke

Dimensions: 1.5 x 2

Brown border: 1.75 x 2.25


I'm anticipating that the hardest part will be cutting everything to size because I tend to nit-pick, over cut and sometimes get them crooked. I'll be toying around with pre-cutting the paper before I feed it through the printer and see how that goes. There's also going to be a little bit of trickery on the software side to get them to print out but I'll be explaining that in another post.

Wednesday, January 20, 2010

Envelope Lining

I came across this project while perusing though other pages and really liked the idea of having the envelopes lined. While I really wanted to have an engagement picture of us as the liner I figured that most people will tear the top portion open with a letter opener and destroy the nice picture. Keeping that in mind I was on the hunt for some scrapbooking or wrapping paper that would work with my pocketfolds instead of being a distraction.

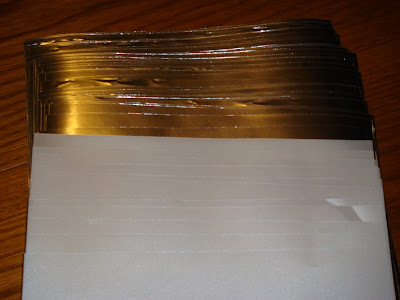
Searching through endless amounts of X-mas, birthday and other holiday prints I finally decided on using just plain 'ole silver to line the envelopes for the majority of them. For a select few for our parents, siblings and grandparents I'll be using a pearl colored thick vellum paper that I was able to get 5/$1 at Michaels in the scrapbooking section.


The next part is fairly straight forward but if you want to skip all this nonsense the measurements for the square template for the inserts are 7-1/16" by 6-5/8". This only works if your envelopes are 7-1/4" by 8-3/4" unfolded with about a 5/8" glue strip which is technically an A7 with a straight across flap that I got online from envelope mall. If you don't have that type of envelope the next few paragraphs and pictures are how I got to the template, otherwise skip ahead to the **.

The instructions are really simple and begin with making a tracing template. Start by getting an envelope you don't mind destroying with pencil lead or from cramming the template inside to see if it fits. Open the flap and put the envelope address side up on a piece of cardstock, cardboard from a cereal box or even some thick paper from something like the phone book cover; just don't use corrugated cardboard. Pushing down on the envelope to smoosh it as flat as you can get the sucker, trace to get an outline.


Since this is a template, cut out what you have so far and trim where necessary so you can fit it in there. It doesn't matter at this point if the left and right sides are completely straight but make sure the top of the template isn't too tall.


Next, measure the thickness of the glue strip so you can exclude it from your liner; it's alright if you over compensate for this a little. While I have a flat flap instead of a Euro flap it will be easy for me to just measure a straight line for the glue strip. Those that have a Euro flap might want to make a few marks for where the glue would sit and use the envelope again to trace at those markings.


Insert the template inside the envelope again to make sure the template doesn't cover up the glue strip, trimming where needed.


Lastly, I was unsure about the white space around the liner so I looked up some pictures as well as some of the samples acquired through friends' wedding invitations to find that the insert is just one big square at least for the straight across flap. This was why I wasn't too concerned about the left and right sides were perfectly straight because you'll be cutting them away (same with the Euro flap style) to allow for a border.


So with that, I traced some of the inside of the pocket for a re-inserting reference, eyeballed where I wanted the white space to be and cut the template into a square instead of the outline that it was. Re-insert the template and cut small amounts away until you're satisfied with how the template looks inside the envelope.


*****************************************************************
So with the easiest part done, use your brand new template on your paper and trace out as many as you can get (or need) and cut them out using whatever method you're comfortable with. Make sure to erase the lines after cutting out the inserts if you are using vellum paper or it will show through; you won't have this problem if you're using regular paper.
Trace


Cut


Stack of them


Now for the glue.
Before I decided to slather on a bunch of glue on to my printed envelopes when I didn't have enough to replace them all, I tested the glue. What I was afraid of was having the tacky glue wrinkle or somehow negatively effect the liner or the envelope paper. I was very glad I did because this is what I got:


Gross right?
So I looked around the apartment and my desk at work to find a glue stick. I read a while ago on a help thread that a glue stick would be the best and cheapest way to go if you were worried about wrinkling your paper. You can use double sided tape or glue dots but you can see where the both of those are with thinner paper, plus I can't stand using either of them. This is what I got from the glue stick:


Once I decided on the type of adhesive to use, it was time for the tricky part. Since I didn't have the envelopes from before they were assembled in their current form, I would need to find a way to get the liner into the envelope without destroying the envelope or the liner. This proved to be somewhat difficult, but found that using wax paper made everything easier.

First I put a small strip of glue from the glue stick on the top edge of the liner and aligned it to the glue strip on the envelope:


Next I flipped over the liner and put another line of glue on the bottom edge and then took some wax paper folded it in half and put it over the glue making sure I had enough wax paper that I could fold over to the other side.


With the liner still folded back I put a last strip of glue on the fold of the envelope. This was to prevent the liner from rolling away from the envelope when opening at the flap or from detaching if a letter opener was used to open the envelope.


The next two steps were a little tricky and require patience but you take the liner, roll it up and away from that glue strip you created in the last step and insert it into the envelope. Gently scoot the liner in there and detach it from the glue strip when it gets caught rather than pushing down on that big "bubble" you created.


Smooth the liner down at the glue strip and reach in to grab the wax paper that's attached to the bottom part of the liner. This should roll the liner up to you with the glue side up but be gentle and pull at the wax paper evenly along the width.


Remove the wax paper from the glue and push it back into the envelope, lifting the envelope to make it easier to reinsert and keep the glue from sticking. If you're using thinner paper be nice and coddle it to avoid poking through the paper and don't worry about wrinkling the it a bit because no one will really be seeing this part.


Wipe away any excess glue you see and weigh down the envelopes when you're finished.


After giving the glue enough time to dry go through them and see if any need to be separated or if the pockets accidentally got stuck closed.

That's it! Envelope liners = CHECK!!