Sorry everyone for all the lose ends I left. Turns out the wedding was a huge success that was viewed by a lot of people in person, and even more over the web. We were so lucky to share the day with many, many coworkers and family who couldn't make it there, and they had a blast arranging their own mini-viewing parties.
As time moves forward I'll try to finish all the stories as well as share the results of the chaos. School and work have been extremely persistent at taking my attention and causing me a lot of stress but hopefully I can update everything sooner rather than later just in case someone out there wants to use any part of this. Happy wedding planning!
Wednesday, October 26, 2011
Tuesday, July 20, 2010
MIA
Big bad rant that has been sitting in my inbox for a month and a half. I've been hesitant to post this, let alone think about this since it makes me sad and incredibly angry as well. My fiancee knows about this situation, and also thinks it's bs.
First a little background. My younger sister has been dating this guy off and on for a few years and currently they're on... and she's pregnant. They are not married currently, but they do plan on marrying after the baby is born so the state can pay for the birth and medical items for her and the baby. In addition, he's black and my family is white. While this shouldn't matter, my dad is a semi-closet racist and gets angry, non-talkative and downright mean whenever she and her boyfriend come around to my parent's house. I have not seen this interaction, but this is because I live on the west coast while they live near Philly and only have hearsay to go on; however I have seen how my dad's mood stiffens and changes around anyone who isn't white.
Oh, it gets better from here. A month or two ago my little sis and her boyfriend got into a car accident and all involved parties were able to walk away from the crash with all of the air bags deployed and my sis's car totaled. Her boyfriend was driving but the lady that hit their car ran the light so this was in no way his fault. Unfortunately my dad is a jerk and this doesn't help his racism and misguided unpleasantness towards this poor guy.
My involvement with this is that my "dad" e-mails me back in early June and says he's deciding that he will not be coming to our wedding. His reasoning is that he "will not put [him]self in the same room with the person who knocked up but will not marry [my] sister." His words, verbatim. First reaction was that I don't have to tell him that I didn't want anyone walking me down the aisle, second was how dare he miss out on our wedding because of something so petty. My little sister and I suspect that the real reason he's not coming is because she's dating a black man, and I invited him without a second thought or hesitation.
I had something all typed up, nice, pretty, and eloquent that basically told him he was a f'ing child, without all the cussing I thought of when I first read his e-mail. There was some crying, ranting, pacing, and throwing of papers while I let it all out in front of my fiancee. He was a dear, let me throw my temper-tantrum and then helped me re-work the e-mail I had drafted in a fit of rage.
The e-mail still resides in my inbox, but I'm leaning towards not sending it his way. My thoughts are that he's giving me a free pass not to talk to him, and I'm sort of fine with that even though I want to chastise and smack him upside his head. The reasoning behind not talking to him is because he cowardly sent me an e-mail instead of calling me and is missing out on his eldest daughter's wedding who is the first to get married out of his children; this is all inexcusable to me. True, I think this is a little bratty, but I feel justified by not responding.
Friday, July 16, 2010
Ze Dress in all its Altered Glory!
I had a little bit of a hard time with this since I gained a bit too much "happy" weight since a year and a half ago when I bought the dress. My whole goal was to start going to the gym beginning sometime in March to start getting in shape, but that didn't take. I blame a lot of it on stress from the massive accounting project (I had no idea was going to take so long or be so difficult) and started consuming about a fifth of rum a week and stress snacking for the two months I was working on the damn thing. It took almost a week to recover from this before I started a summer business law class that also had a large group project that took more time than expected.
Overall, I failed to go to the gym like I planned, but I did join up with the Rolling Hills Derby Dames in an attempt to make friends, get some exercise and learn a new sport. Granted it had been a while since I had been on quads and I'm a bit klutzy, but it is a great workout and the gals are fun. This has finally gotten me motivated to go to the gym with my fiancee (who's been going regularly for over a month) because I've been quite pissed at myself for getting so out of shape. Hopefully I'll be able to at least shed 5lbs before my wedding date so I don't look too chubby in my dress.
With that, my first fitting in late May was really disappointing because I knew that I had gotten fat, I just didn't know if I had gotten too fat to let the dress out without damaging the dress. At this time the David's Bridal seamstress and I had decided that we would stick with changing the neckline from straight across to a sweetheart and put in the bustling since I had a goal to loose some weight.
The second fitting came at the end of June and I still hadn't made any progress. I had expected this and thought that putting in a corset backing would help. The seamstress was very kind, pinned in the concept for me, and viola the dress finally felt like it fit and I could breathe again. Once again the dress went into alterations and stayed out of my closet which made me a little upset but I knew that it would eventually be in my possession.
This last Wednesday I got my dress back and couldn't be happier! The corset ribbon that I made for it worked perfectly and looks beautiful. The dress even accents my curves instead of squashing them into the dress and I couldn't be happier with the way it looks on me. So this is what the dress looks like now in all its glory, but I might need to re-work the sweetheart neckline since it looks thrown in instead of thought out.


So happy! 19 days left!
Thursday, July 15, 2010
Corset Ribbon
I forgot to take pictures throughout the process so my doodling will need to suffice.
Step one: find your ribbon
I chose a light blue sheer ribbon and a white satin ribbon so that I could see the light blue ribbon. My dress also has a sheer organza overlay and has around the same color of blue already in the dress so this works well. I believe I chose a 1-1/2" wide ribbon for both and bought at least a 4 yard spool.


Step two: sewing together
 This is where the doodles come in because I just went for it, sewed it all up and then realized I should have taken photos. Line up the sheer ribbon on top of the white satin ribbon and sew straight across the ends to have them together. Make sure that they're aligned because this is a guide for sewing the rest together.
Step three: the pull
 I call it the pull because later, after all the sewing is finished, you will be pulling this to turn the ribbon right side out. Pretty straight forward, find something long, durable and thin like twine or thick string and also sew straight across this to the ends that you just sewed together. Make sure the pull is secure so you don't loose it while turning the ribbon right side out, this may require you to do a few passes over it with the sewing machine.
Step three: fold
Fold the ribbon over the twine hot dog style so that the twine is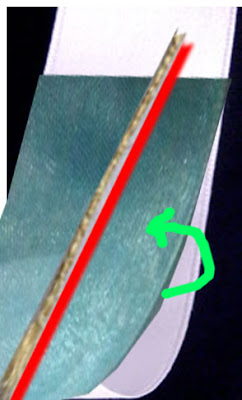
 on the inside with the ribbon you eventually want to be on the outside. If you want to, take the iron to the fold so you get a crease and make it easier on yourself in the next step. I didn't do this and I wished later that I had individually ironed a crease into the layers because it probably would have made things easier. Oh well, live and learn.
Step four: lots of sewing
 This requires lots of patience because you need to make sure you are sewing both sides of the ribbon sandwiched inside and ribbon currently outside without running over your pull all while trying to get the stitch as straight as possible. Don't worry if you don't get everything completely straight because no one will really notice unless they look over the entire length and are looking for imperfections.
Step five: pull the pull

 VERY CAREFULLY pull on the other end of the pull that is not sewn down so that the ribbon on the sewn end starts to roll inside to turn the ribbon right side out. This also requires lots of patience but doesn't take nearly as long to do as the sewing.
Step five: spot check
Most likely there will be one or two places that the organza ribbon did not get sewn into the satin ribbon. Calmly and patiently turn the ribbons inside out until you get to the trouble spot, pop some of the seam until you can correct the positioning of the ribbon and run it over with the sewing machine again. Turn it right side out and double check the correction.
Step six: iron
What I did to help was grab a long metal rod, feed it all the way through and used it to make sure everything inside was laying flat and not bunched up. I ironed on a medium heat to crease everything and made sure my seam remained on the same side and didn't twist around as I removed the rod and then went over it a second time to be sure. It does have some areas that are a bit chunkier than others but you can't really tell in this photo and I don't think anyone will be able to tell when it's strung in the corset backing either.


Step seven: lace and sew up
This is simple; lace up your dress, make sure the length is correct, snip off the excess and then you can just turn the ends inward and either hand stitch or run them over with the sewing machine to close the ends.
Ta Da!
=check!
Step one: find your ribbon
I chose a light blue sheer ribbon and a white satin ribbon so that I could see the light blue ribbon. My dress also has a sheer organza overlay and has around the same color of blue already in the dress so this works well. I believe I chose a 1-1/2" wide ribbon for both and bought at least a 4 yard spool.


Step two: sewing together
 This is where the doodles come in because I just went for it, sewed it all up and then realized I should have taken photos. Line up the sheer ribbon on top of the white satin ribbon and sew straight across the ends to have them together. Make sure that they're aligned because this is a guide for sewing the rest together.
Step three: the pull
 I call it the pull because later, after all the sewing is finished, you will be pulling this to turn the ribbon right side out. Pretty straight forward, find something long, durable and thin like twine or thick string and also sew straight across this to the ends that you just sewed together. Make sure the pull is secure so you don't loose it while turning the ribbon right side out, this may require you to do a few passes over it with the sewing machine.
Step three: fold
Fold the ribbon over the twine hot dog style so that the twine is

 on the inside with the ribbon you eventually want to be on the outside. If you want to, take the iron to the fold so you get a crease and make it easier on yourself in the next step. I didn't do this and I wished later that I had individually ironed a crease into the layers because it probably would have made things easier. Oh well, live and learn.
Step four: lots of sewing
 This requires lots of patience because you need to make sure you are sewing both sides of the ribbon sandwiched inside and ribbon currently outside without running over your pull all while trying to get the stitch as straight as possible. Don't worry if you don't get everything completely straight because no one will really notice unless they look over the entire length and are looking for imperfections.
Step five: pull the pull

 VERY CAREFULLY pull on the other end of the pull that is not sewn down so that the ribbon on the sewn end starts to roll inside to turn the ribbon right side out. This also requires lots of patience but doesn't take nearly as long to do as the sewing.
Step five: spot check
Most likely there will be one or two places that the organza ribbon did not get sewn into the satin ribbon. Calmly and patiently turn the ribbons inside out until you get to the trouble spot, pop some of the seam until you can correct the positioning of the ribbon and run it over with the sewing machine again. Turn it right side out and double check the correction.
Step six: iron
What I did to help was grab a long metal rod, feed it all the way through and used it to make sure everything inside was laying flat and not bunched up. I ironed on a medium heat to crease everything and made sure my seam remained on the same side and didn't twist around as I removed the rod and then went over it a second time to be sure. It does have some areas that are a bit chunkier than others but you can't really tell in this photo and I don't think anyone will be able to tell when it's strung in the corset backing either.


Step seven: lace and sew up
This is simple; lace up your dress, make sure the length is correct, snip off the excess and then you can just turn the ends inward and either hand stitch or run them over with the sewing machine to close the ends.
Ta Da!
=check!
Thursday, July 8, 2010
Cake Num Num
We finally picked out a cake design! After months of perusing around the interweb I was able to narrow down the selection to a few cakes that my man and I could choose from. He eventually thought that this one was the one that should be our cake:

I did it one better (since I wanted chocolate buttercream frosting) and tweaked it in photoshop to look like this:

The venue said that they would be able to do this! I was trying to keep things simple and was even a little worried about how complex was too complex but I'm thrilled that we didn't have to go through the whole design selection portion all over again. The majority of the cake will be in buttercream but the blue bands will be in fondant instead of ribbon for cutting purposes and the white scrolls will have a little bit of silver cake dust on the raised parts to add a little *pop* to them.
But the fun didn't stop there. Once we decided on how the cake would look like, we needed to figure out what would go inside. It took a bit of communication with the catering people to find out if they could do this but we'll be having two layers of chocolate cake with peanutbutter buttercream (yum!) and one layer of vanilla cake with raspberry buttercream. I have no idea what this will taste like, since they don't do cake testings there, but I can only hope that it will turn out to be what I'm thinking it will taste like.
Monday, June 21, 2010
Bubbles and Fans
Now that my summer class has finally ended, I have been able to get back to the wedding planning process. There's already a more complicated project going on right now, but I figured that I would knock off one of the easier projects. This time it was the bubbles and fans.
Items:
- Assortment of fans purchased through The Knot
- Bubbles purchased through The Knot
- Ribbons purchased on sale at Michaels
- Flower boxes purchased at Ikea
I started this off by unloading all three 48-count boxes into one of the flower boxes. My fiancee though this looked fine, but I wanted it to look more organized and stay organized when people take out the bubbles. So I took the cardboard spacers that came with the bubbles and used that to keep the bubbles all in place.

Here's a photo of the bubbles in the boxes with the cardboard spacers in place. I wanted to see what this would look like with the fans so I took them out of the boxes and placed them into the other flower boxes I had. My fiancee kept on laughing at me because I would have to put all of the fans back into the boxes afterwords. He just thought it was funny how obsessed I was with seeing everything all together.

This was not the final result, just how everything would looked all spaced out. To spice things up a bit, I purchased some ribbon during an easter clearance sale and used it to decorate the bubbles. Due to poor planning, I only grabbed one roll of brown ribbon and should have probably grabbed two.
The ribbon was cut into 6" lengths and then I tied two pieces around the heart base of the bubbles. Half of the bubbles had one brown and one white ribbon while the other half had two white ribbons.


All together:


But the fun doesn't stop there! Because I had so much ribbon left over I decided that there needed to be more to these boxes. With that, I took a hand punch to the sides and spent time looping the ribbon through the holes to make the sides look fuller.


There were a couple of snaffoos with punching the holes too close together or being a little too rough with cinching down the ribbon which resulted in tearing which resulted in tearing the cardboard. I fixed this situation by using judgment to cover up the tears and came up with a fuller looking result:


This may or may not be the finished project because the boxes don't have a polyurethane coating on them to be water resistant. We may end up staining the wood as well, but we're still pondering if we want to do that. For now, the boxes are (mostly) assembled!
Friday, May 28, 2010
Flowers
They have been decided on! Here's what I got:
For the Bridesmaids they will be carrying feather fans that I purchased off of eBay through cynthiasshope and I will also be getting them white alstromeria corsages to wear. I might try to get the feather fans to an airbrush artist to try and get a white to blue painted tips effect. The fans that I purchased are alright, but needed a little bit of picking to remove some of the stray pieces of colored fuzz and lint the was clinging to the fan. Overall the fans were a great purchase because the price of all five of these fans for my ladies was about equivalent to one bouquet at the Monte Carlo.


For the Groomsmen I thought we would keep it simple with a white alstromeria boutonniere like the one pictured in below and add some light blue belladonna (also called delphinium) to coordinate with the dresses the ladies will be wearing.

For the Mothers/Grandmothers present, I decided that they should get something special to feel included so I ordered white dendrobium orchid corsages for each of them. Hopefully the floral department gets them to look very close to this picture because it's very pretty.

For the Fathers/Grandfathers present just a simple ivory rose with rose leaves boutonniere for them. I didn't want them to feel like they were wearing almost a bouquet's worth of flowers on their chest so I'm keeping it simple and classy. I also requested that all the boutonnieres have that little curly-q on the end that this one does.

For the Groom, he gets a single ivory rose with greenery and white sweet peas added; simple and effective.

For me, the Bride, I decided to go with a bunch of ivory roses with a bunch of white sweet peas and feathers added. I'll be able to bring in the feathers that I ordered from lamplight feathers as well as my own ribbon for the wrap that I bought on a 50% sale at Michaels.


Wednesday, May 26, 2010
Cake Topper
A few weeks ago I started the search for our cake topper. After perusing Google images, The Knot photos and randomly looking through eBay for whatever was on the market I managed to come across a few that I liked. I ran it by my man and he chose the one that I eventually ended up getting, but I had to do a quick search for the item and found it on Amazon. For anyone who likes this topper, the style is The First Kiss Topper by Wilton.

*pretty*

*pretty*
Wednesday, May 19, 2010
Bad GS Cookies!
Alright, so it's not just the Girl Scout cookies, but probably also the rum and Pepsi drinks I've been consuming that has contributed to my excess "happy" weight. Admittedly, I probably could have worked on getting in shape, eating better, having smaller meals and yadda yadda yadda, but somewhere I fell into a zone where all that didn't matter so much and I didn't really care. All of this leads up to my first fitting where I was rather embarrassed to find that my size 8 dress no longer fits as well as it did in March '09 and might need to be let out quite a bit to where I probably should have invested in a size 10 instead.
So even though I hated the idea of crash dieting, it sounds exactly what I'll be close to doing. Granted there will be no starving myself for the sake of being skinny, but more like I'll be cutting back on the size of my meals, eating apples instead of potato chips and whatnot to get back down from the 170 that I'm at now to the 150 I was then. The horrible part is that in all my stubbornness I'll probably try to bull-head my way into working out my body to force it into the desired shape. This does not mean that I'll be working out until I break or tear something, just that I'll most likely be working out until I'm an exhausted mess.
Hopefully with recognizing that I need some drastic changes to squeeze into my current dress this will get me to finally grab a hold of the mind set that I should have been in since January. The only problem with all of this is that I will severely miss my Captain.
Monday, May 17, 2010
Dress for the Night
After a bit of consideration and research on Vegas temperatures, I decided that it would probably be best to purchase a much lighter, more breathable dress. This way I can go out on the town in a dress that I won't end up a soggy, sweaty mess in by the end of the night. It took a lot of searching and redefining my search words but I was able to find this by looking for a Marlyn Monroe type dress with a tie-back halter style. I found this little number online at eBay and after showing my man I decided to purchase it. Right now it's on the way but I can't wait to try it on.


Friday, May 14, 2010
Feather Fans!
Yes this is a bit odd but after talking to my Maid of Honor I decided to at least try this out. For quite some time I had been playing around with possibilities for bouquets and hadn't quite found something that gave me that "wow" factor without hurting our budget. While searching for feathers, because I was trying to figure out how to incorporate feathers into the bridesmaids bouquets, I stumbled upon these babies.

I was already going to try and get enough fans for all of our female attendants but this just looks like a fun idea for my gals. The best upside to this is the wedding venue wanted about $55 per bouquet; I got enough fans for all five of my girls at about the same price as one of those bouquets. Super save!
My hope is that these fans aren't as tacky as I think they might turn out and if they're fine I'll be looking into decorating them somehow. My Maid of Honor suggested going to a tattoo artist that also does airbrushing and have them do some airbrushing on the fans. I love that idea, I just don't 100% know what I'll be doing. The idea that I'm running with is to have the artist paint the tips of the fan light blue and have the fan look like it's dissolving from white at the base to the blue tips. She suggested having a flower airbrushed on to the fans but I'm having trouble envisioning this.
If this all doesn't turn out to my liking I can still use the fans I don't have experimental paint and whatnot all over for my mom, his mom and possibly my two grandmas.
Some close runners up were to have either white alstromeria or carnation bouquets, but if this works out we'll end up saving quite a bit of the budget for other things.
Wednesday, May 12, 2010
Backlog
My apologies to anyone who has been following this blog. For the past few months I've been concentrating on classes, work and planning a wedding and all of it reached a point of ultimate stress about a few weeks ago and I'm just now getting back into my stride. Eventually I'll get caught up on updating everything, but that will probably take a bit of time because I'm still taking classes through the summer.
As a spoiler alert I'm working on slimming down, I've turned in my dress to David's Bridal for it to be altered, bid on a dress to wear for going out on the town on our wedding night, set up a hair trial appointment, thought about centerpieces, flowers and other such stuff to be revealed in future blogs. Also, I love and hate Google but then again it's probably the retailers fault for mislabeling their products for search-ability, but then again Google doesn't list everything from lowest to highest price even when you tell it to do so.
That's all for now, I'll try to catch up a bit more later.
Saturday, March 27, 2010
Invites Away!
After much work and shouting at the printer I was finally able to assemble and send out our invitations. There are still a few people I'm waiting due to address changes but for the most part I sent the bulk of them out about a week and a half ago. While this was a learning experience, there were a few things that I would have done differently if I knew then what I know now.
For starters, I would have done the pockets differently. While I did like the design, the problem was they either stuck too well in some cases making it difficult to stuff and remove the inserts or not well enough so that they needed to be re-glued. What I would have done differently was to use something along the line of a sticker on the inside of the pocket to make it more like a pouch or try a more radical solution like sewing the pocket together instead. Unfortunately I was to the point where the invites were almost finished and was able to get around this problem with a butter knife to loosen the pocket or a glue stick to re-secure the pocket.
The printer was a whole other issue. When I initially started the images in Photoshop they were all sized normally as I wanted them. Eventually my fiancee and I figured out that if you scale the image up in Photoshop and then shrunk it down when you sent it off to print that it enables the anti-aliasing feature to make the image crisper. Slowing down the print speed also helps to give the printer more time to fully ink the project properly.
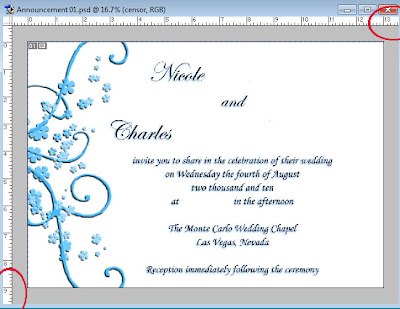
First scale up the image by going Image -> Image Size
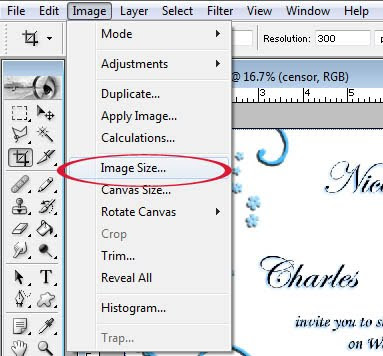
Next, scale up the image by selecting percent and input either 200 or 400 for both the height and width.
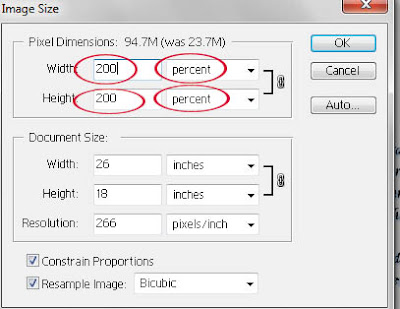
When you're all finished with designing the invites hit Ctrl+P to pop up the print screen. Position the image where you want to get multiple items on a the page. Next, the most important part, scale down the print size in this window so you can have the anti-aliasing take effect. Use 50% downscale for a 200% larger image size (see last step), 25% for 400% etc.
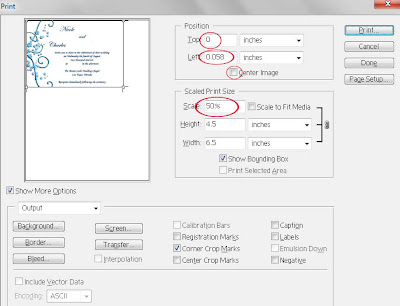
Lastly, print the suckers. Make sure to select the right paper type, have it enabled for photo printing and don't print in high speed for best results. Save this template if you need to print multiple files at this quality to save yourself the headache of remembering to do all this every time. Do not scale the media here, it will just cut off everything that didn't make it on the page and scale down everything that did leaving you with half (or less) of your project. Make sure you have patience, extra ink cartridges and lots of alcohol while printing.

The software portion of printing was the tricky part, but sizing the paper was also difficult. In the end I decided to cut the paper to the width I needed and not worry about the bottom because I would just be cutting it off later anyways. The pocket fold closers had to be dealt with a bit differently since my tray width wouldn't go that small, so I just printed on the smallest width I could and cut off the excess
The embossing was a bit tricky as well, but I only embossed the announcement and pocketfold closers. At first I tried using an embossing marker so I could trace over the image and sprinkle on the embossing powder. This took much longer to to than anticipated and it also marked anything blue instead of being "invisible" or "watermarking" the paper. Instead the solution I came up with was to yank them out of the printer as soon as they were done printing and sprinkle on the powder while the ink was still a little wet. This process had mixed results but was far easier than tracing the large graphic. Sure it didn't stick so well (if at all) to the black ink, but it clung to the blue ink rather well if I didn't wait to put on the powder and gave the added oomph that I was looking for.
Gluing was nothing special. I just used a standard glue stick and put the pieces of brown card stock together (sizes mentioned in previous post) with the pieces I just printed off and viola!
Belly bands were the easiest part of this entire project, finding the ribbon again in case I needed more than what I originally calculated was a pain in the ass. Luckily I didn't need any extra ribbon, but bought some that looked similar just in case.
Just measure around a folded invite

cut


fold the ribbon

and then using the same invite and some wax paper, secure the ribbon and closer together with some hot glue leaving some slack to slip the ribbon on and off the invite. The wax paper is there so you don't get hot glue all over your nice invites and can still use the one you used to measure everything out.
With everything made all that was left to do was stuff the pockets with all the inserts, slide on the belly band and make sure I've got the right envelope before I stuck it in the envelope and sealed it for good.


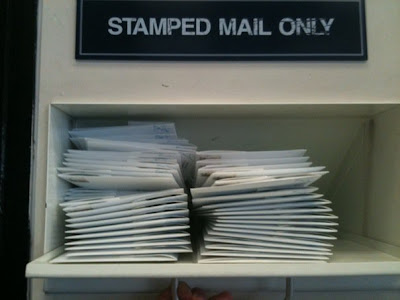
So with all the hard parts done, I took all of the finished invites (I was still missing addresses on a few) down to the post office, weighed one and got enough 61 cent stamps for all. Once all the stamps were on I loaded them up into the drop box and said good bye to months worth of planning, experimenting and hard work.
For starters, I would have done the pockets differently. While I did like the design, the problem was they either stuck too well in some cases making it difficult to stuff and remove the inserts or not well enough so that they needed to be re-glued. What I would have done differently was to use something along the line of a sticker on the inside of the pocket to make it more like a pouch or try a more radical solution like sewing the pocket together instead. Unfortunately I was to the point where the invites were almost finished and was able to get around this problem with a butter knife to loosen the pocket or a glue stick to re-secure the pocket.
The printer was a whole other issue. When I initially started the images in Photoshop they were all sized normally as I wanted them. Eventually my fiancee and I figured out that if you scale the image up in Photoshop and then shrunk it down when you sent it off to print that it enables the anti-aliasing feature to make the image crisper. Slowing down the print speed also helps to give the printer more time to fully ink the project properly.

First scale up the image by going Image -> Image Size

Next, scale up the image by selecting percent and input either 200 or 400 for both the height and width.

When you're all finished with designing the invites hit Ctrl+P to pop up the print screen. Position the image where you want to get multiple items on a the page. Next, the most important part, scale down the print size in this window so you can have the anti-aliasing take effect. Use 50% downscale for a 200% larger image size (see last step), 25% for 400% etc.

Lastly, print the suckers. Make sure to select the right paper type, have it enabled for photo printing and don't print in high speed for best results. Save this template if you need to print multiple files at this quality to save yourself the headache of remembering to do all this every time. Do not scale the media here, it will just cut off everything that didn't make it on the page and scale down everything that did leaving you with half (or less) of your project. Make sure you have patience, extra ink cartridges and lots of alcohol while printing.

The software portion of printing was the tricky part, but sizing the paper was also difficult. In the end I decided to cut the paper to the width I needed and not worry about the bottom because I would just be cutting it off later anyways. The pocket fold closers had to be dealt with a bit differently since my tray width wouldn't go that small, so I just printed on the smallest width I could and cut off the excess
The embossing was a bit tricky as well, but I only embossed the announcement and pocketfold closers. At first I tried using an embossing marker so I could trace over the image and sprinkle on the embossing powder. This took much longer to to than anticipated and it also marked anything blue instead of being "invisible" or "watermarking" the paper. Instead the solution I came up with was to yank them out of the printer as soon as they were done printing and sprinkle on the powder while the ink was still a little wet. This process had mixed results but was far easier than tracing the large graphic. Sure it didn't stick so well (if at all) to the black ink, but it clung to the blue ink rather well if I didn't wait to put on the powder and gave the added oomph that I was looking for.
Gluing was nothing special. I just used a standard glue stick and put the pieces of brown card stock together (sizes mentioned in previous post) with the pieces I just printed off and viola!
Belly bands were the easiest part of this entire project, finding the ribbon again in case I needed more than what I originally calculated was a pain in the ass. Luckily I didn't need any extra ribbon, but bought some that looked similar just in case.
Just measure around a folded invite

cut


fold the ribbon

and then using the same invite and some wax paper, secure the ribbon and closer together with some hot glue leaving some slack to slip the ribbon on and off the invite. The wax paper is there so you don't get hot glue all over your nice invites and can still use the one you used to measure everything out.
With everything made all that was left to do was stuff the pockets with all the inserts, slide on the belly band and make sure I've got the right envelope before I stuck it in the envelope and sealed it for good.


So with all the hard parts done, I took all of the finished invites (I was still missing addresses on a few) down to the post office, weighed one and got enough 61 cent stamps for all. Once all the stamps were on I loaded them up into the drop box and said good bye to months worth of planning, experimenting and hard work.

Subscribe to:
Posts (Atom)