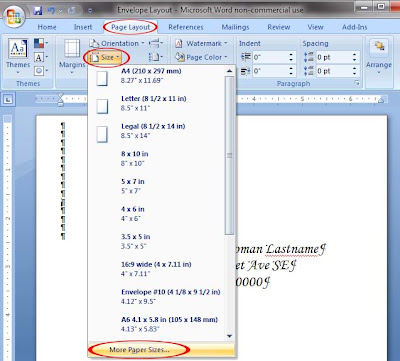
Open a new document, go to the "Page Layout" tab click on "Size" and select "More Paper Sizes" if you don't already see your envelope size there.

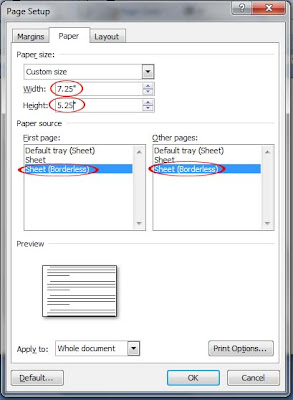
This should bring up a menu that has you in the "Paper" tab. In that tab put in your envelope width and height and select "Sheet (Borderless)" for both first and other pages.

Next click on the "Margins" tab and set the top, bottom and right margins as far as they can go at .12" with the left margin at .5" and click ok. I had the margins this way so that the left side would be slightly indented as you can see on most printed envelopes.

Using Arial 11pt font with single line spacing go about 14 lines down before starting your text. I know there's a better way to do this by using the "Mailings" tab and selecting "Envelopes", but you don't get to see how the layout looks before you print. So back on track, 14 lines down I centered the text and used Monotype Corsiva 22pt font for the names & addresses. This is the font I used inside on the invites so that it all ties in with everything else.

Next, we test print to check the positioning and text size on a regular piece of paper. Fold the paper to the size of the envelope after it has been printed to get an idea how this all will work so you don't waste too many envelopes in just testing. Adjust the address so that the name line is around the center vertically (if you chose a different font) and play with the size until you're satisfied that the font isn't too large or small to you.
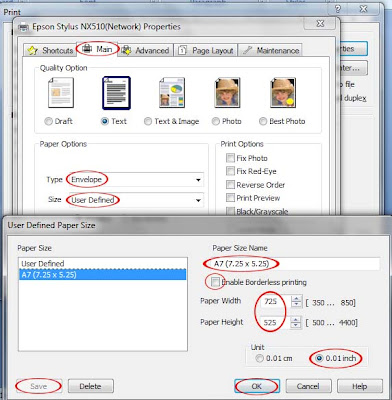
Once you've got all that figured out you're ready to print on the envelopes. Go to the printer properties and from here everything might differ based on your printer but it might give you an idea of what you'll need to do. In the main tab under paper options set the type to "Envelope" and size to "User Defined" if your envelope size doesn't show up in the drop-down menu which will open up a window. In this window set the paper width & height making sure the units are in inches, not centimeters, saving and naming the settings if you wish and then clicking ok to close the window. Click ok on the properties window and ok to print and that's it for the software.

As for your printer, make sure you adjust your paper width on the loading tray so that there is no extra room for the envelope to "wiggle" around and miss-align all that hard work and load the tray one envelope at a time to prevent the printer from grabbing multiple envelopes and jamming. Then that's it. TA DA!
You don't necessarily need to do this the same way I did, but it's just the way my brain works and how I got this to do what I wanted it to. As a side note, I created and printed the envelopes one at a time and saved one random page as a template to come back to later and run off a few more as I finalized addresses and correct spellings of names. I also plan on lining the envelopes but held off on doing so until after I printed on them because I was worried that the extra paperweight would tick-off the printer and cause it to malfunction somehow. Hope this helps anyone out there.
No comments:
Post a Comment